


How To Draw a Christmas Tree Step by Step Tutorial
Learning How To Draw a Christmas Tree can be a delightful journey and rewarding experience.
This tutorial is designed to guide you through each step, making the process accessible and enjoyable for artists of all skill levels.
Whether you’re a beginner looking to learn the basics or an experienced artist seeking to refine your technique, this guide offers valuable insights and tips to help you create a stunning Christmas tree drawing.
Keep reading to find out How To Draw a Christmas Tree with this Step by Step Tutorial.
You might also like:
- How to Draw for Kids
- Creative Drawing Ideas
- List of Art Supplies for Beginner’s
- Art Supplies for Toddlers List
- Art Supplies List for Preschool
- Art Supplies List for Elementary School
- Art Supplies List for Middle School
- Art Supplies List for High School
- List of Art Supplies for Artists
- List of Art Supplies for Painting
Preparing To Draw a Christmas Tree
Before diving into the art of drawing, it’s essential to prepare your workspace and gather the right tools.
This preparation is key to a successful and enjoyable drawing experience, especially when you’re learning how to draw intricate subjects like a Christmas tree.
Gathering Drawing Supplies
- Before you begin, gather all the necessary drawing supplies.
- You will need paper, pencils, erasers, and coloring materials such as markers, crayons, or colored pencils to add a vibrant touch to your artwork.
- With these materials at hand, you can effectively bring your Christmas tree to life.
Setting up Your Drawing Area
- To ensure a smooth drawing process, find a comfortable and well-lit area to work in.
- Set up your drawing area with ample space and good lighting to help you focus and perfect your Christmas tree drawing.
- Having a dedicated space for drawing will make the creative process more enjoyable and productive.
How To Draw a Christmas Tree Step by Step Tutorial
Drawing a Christmas tree is a delightful activity during Christmas time, and with this easy-to-follow step guide, you’ll learn how to draw a Christmas tree easily.
Whether you’re looking for easy Christmas drawings or a more detailed Christmas tree sketch, this tutorial caters to all skill levels.
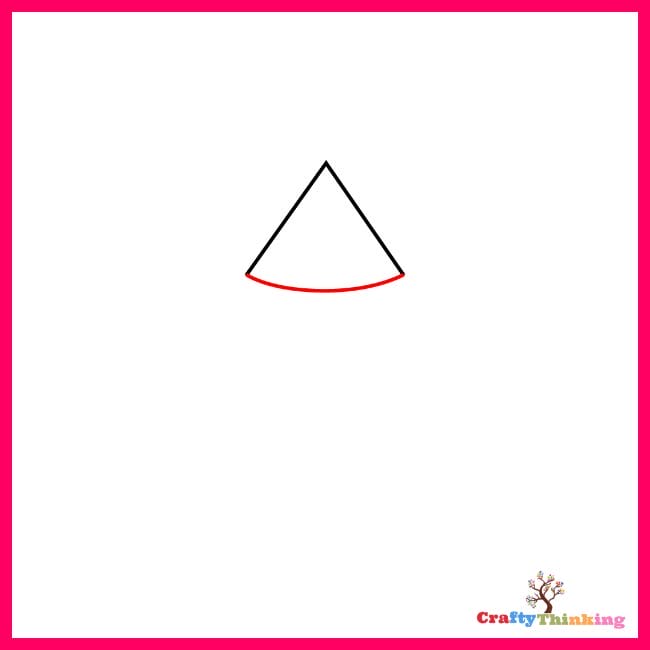
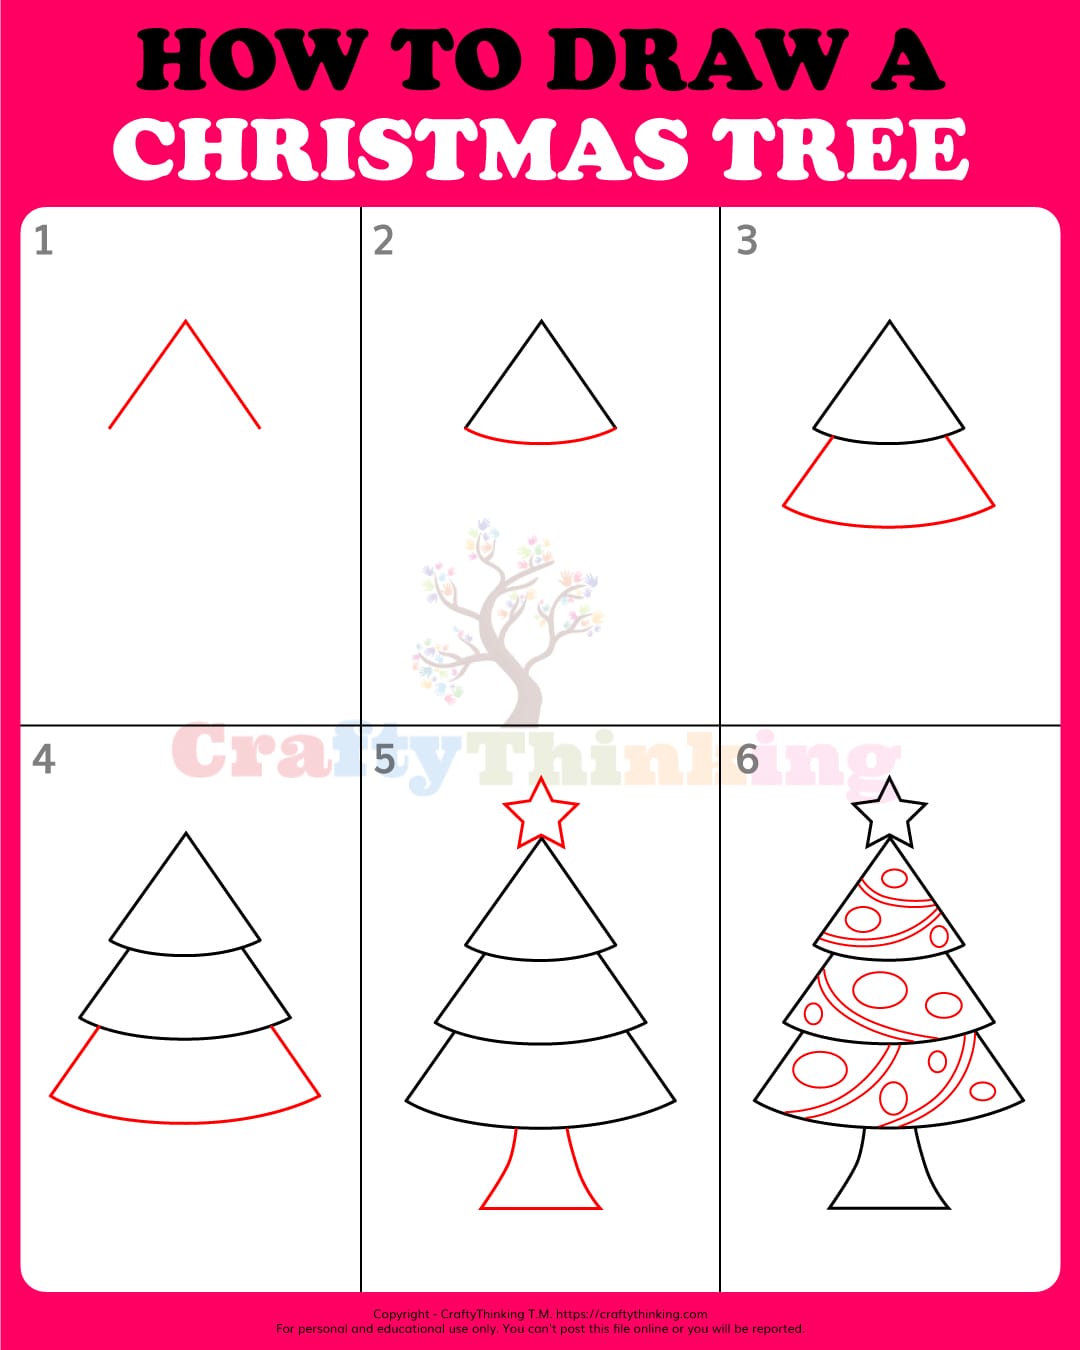
Step 1: The Inverted V Shape
- Begin your Christmas tree drawing by sketching an inverted V shape.
- This forms the basic outline of your tree, resembling a triangle without a base.
- It’s the first crucial step in creating the structure of your Christmas tree.

Step 2: Closing the Base
- Next, close the open end at the bottom of your inverted V shape with a slightly curved line.
- This gives your drawing a shape similar to a pizza slice, marking the beginning of your tree’s unique form.
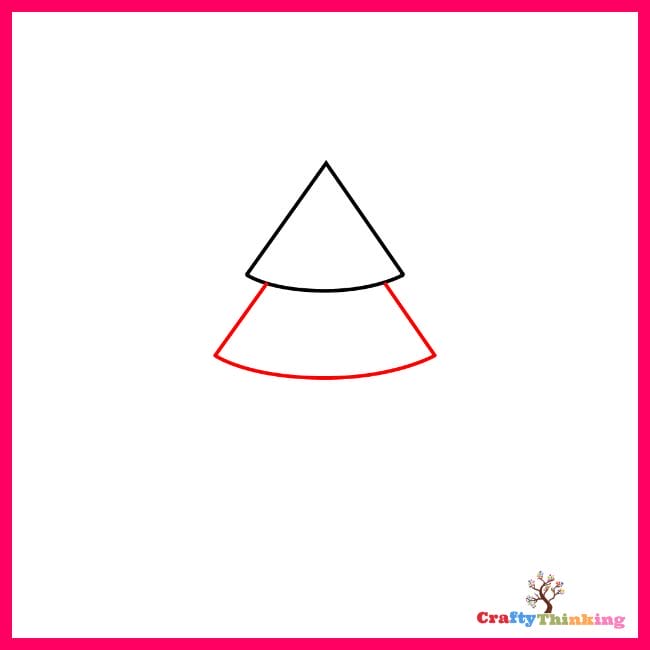
Step 3: Adding a Larger Triangle
- Continue building your Christmas tree by sketching a larger triangle beneath the first one.
- This step is key in gradually developing the overall shape and size of your tree, layer by layer.
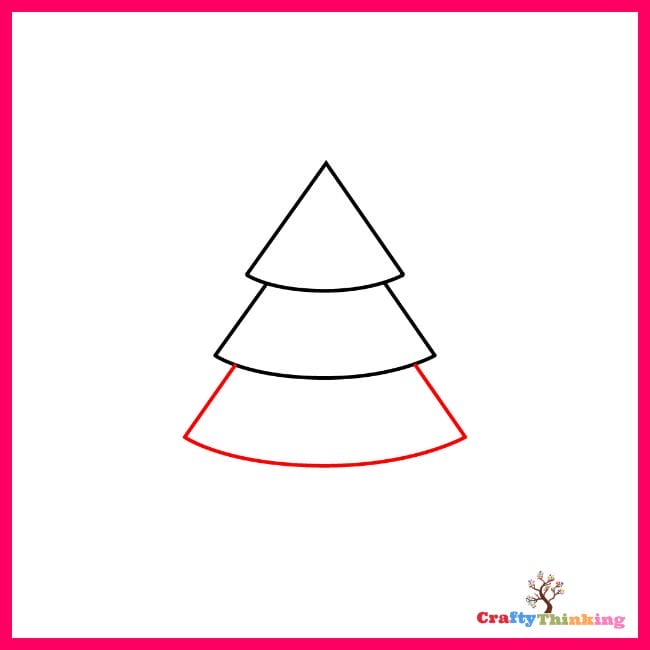
Step 4: Expanding the Shape
- Now, add another triangular shape underneath the previous ones, making it even larger.
- This creates a cone-like structure, composed of smaller triangles.
- It gives your Christmas tree a fuller and more realistic appearance.
Step 5: Finalizing the Basic Design
- Finalize the basic outline of your Christmas tree by adding a star at the top and a trunk at the bottom.
- This step transforms your initial geometric shapes into a recognizable and festive Christmas tree.

Step 6: Decorating the Tree
- Embellish your Christmas tree by decorating it with ornaments, ribbons, and other festive elements.
- This is where you can let your creativity shine, adding personal touches to make your tree unique and vibrant.

Step 7: Adding Color
- In the final coloring phase, bring your Christmas tree to life with color.
- Use yellow for the star and ribbons, and brown for the trunk, to enhance the beauty and charm of your tree.

Congratulations!
- You’ve successfully completed the step-by-step process of drawing a Christmas tree.
- With these skills, you’re now ready to explore more artistic projects and enjoy the creative journey.

How to Draw a Realistic Christmas Tree
Drawing a realistic Christmas tree involves starting with a basic outline, adding layered branches, detailing for depth and volume, sketching the trunk, decorating, and applying final touches.
This process requires attention to detail and patience to create a lifelike and festive Christmas tree drawing.
Remember, the key to a realistic drawing, lies in the details of the branches and the natural placement of decorations.
Materials
- Pencil (Preferably HB, 2B, and 4B)
- Eraser
- Drawing paper or sketchbook
- Colored pencils or watercolors (optional for coloring)
- Ruler (optional for straight lines)
Instructions
Start with the Outline:
- Begin by lightly sketching a vertical line to serve as the center of your tree.
- This line will help you maintain symmetry in your drawing.
- Draw a small triangle at the top for the tree's peak. This triangle will be the guide for the topmost branches.
Add Branch Layers:
- Below the top triangle, sketch a series of wider and longer triangles, each layer slightly larger than the one above.
- These triangles represent the layers of branches.
- Ensure that each layer's bottom is slightly curved to mimic the natural droop of tree branches.
Detailing the Branches:
- Within each triangular layer, start adding individual branches.
- Use a wavy, jagged line to create a realistic texture.
- Vary the length and angle of the branches to add naturalness to your drawing.
Adding Depth and Volume:
- To give your tree depth, draw additional branches peeking from behind the main layers.
- This step creates a fuller, more three-dimensional look.
- Use your darker pencils (2B or 4B) to add shadows beneath each layer of branches, enhancing the tree's volume.
Sketching the Trunk:
- At the base of your tree, draw a small rectangle for the trunk.
- Keep the lines light as the trunk is usually less visible beneath the branches.
- Add texture to the trunk by drawing vertical lines and small horizontal dashes to represent bark.
Decorating the Tree:
- Now, add decorations to your tree.
- You can draw circular ornaments, stars, ribbons, or even lights.
- Place these decorations sporadically across the tree, ensuring they follow the tree's curved form.
Final Touches:
- Erase any unnecessary guidelines and strengthen the outline of your tree and decorations.
- If you're coloring your drawing, choose appropriate shades for the tree and decorations.
- Use lighter colors at the top and gradually go darker towards the bottom to mimic natural lighting.
Adding Background (Optional):
- For a complete scene, you can add a background.
- Consider drawing a festive setting or simply add a floor line and wall to indicate the tree is indoors.
Notes
Did you create this craft? If so, we would love to hear from you! Please feel free to leave a comment on the blog or share a photo of your creation on Pinterest.
Recommended Products
Thank you for supporting our family-owned business!


Additional Tips for an Easy Christmas Tree Drawings
After mastering the basic steps of drawing a Christmas tree, here are some additional tips and techniques to enhance your skills even further.
Creating a Printable Christmas Tree Drawing
- If you want to create a printable Christmas tree drawing, consider using digital tools to scan or replicate your artwork.
- This allows you to share your festive creations with friends and family, or even turn them into personalized decorations or greeting cards for the holiday season.
Using Similar Posts for Inspiration
- When seeking inspiration for your Christmas tree drawings, explore similar posts and artwork from other artists.
- Observing different styles and techniques can provide valuable insights and ideas to incorporate into your own creations.
- It’s a great way to expand your artistic repertoire and spark new creative approaches.
Next Steps to Improve Your Drawing Skills
- To elevate your drawing abilities, consider experimenting with different themes and subjects beyond Christmas trees.
- Embracing diverse drawing challenges can broaden your artistic horizons and contribute to your overall growth as an artist.
- Additionally, seek out resources and tutorials to refine your techniques and expand your creative repertoire.
Frequently Asked Questions
Here are some frequently asked questions about How to Draw a Christmas Tree. Get some quick answers to everything you need to know.
-
Where can I find an easy step-by-step tutorial for how to draw a Christmas tree?
You can find an easy step-by-step Christmas tree drawing tutorial online, especially on art websites or YouTube channels dedicated to drawing and coloring.
These tutorials often provide a simple, easy-to-follow guide, perfect for beginners or anyone looking to get into the Christmas spirit with some festive tree doodling.
-
What are some fun Christmas tree coloring pages that complement the Christmas tree drawing tutorial?
Alongside a draw a Christmas tree tutorial, you can find fun Christmas tree coloring pages on various educational and art websites.
These pages often feature simple Christmas tree drawings, perfect for children or anyone looking to add a personal touch to their Christmas decorations or cards.
-
Can the step-by-step guide help me learn how to draw a Christmas tree easily?
Yes, a step-by-step guide is an easy way to draw a Christmas tree.
These guides typically break down the process into easy steps, such as starting with a basic tree shape, adding branches, and finishing with a star at the top.
They are designed to be easy enough for beginners, making it a fun drawing activity for the holiday season.
-
How does shading along the branches enhance my Christmas tree drawing?
Shading along the branches of your Christmas tree drawing adds depth and realism, making the tree look more three-dimensional.
It can highlight the body of the tree and the texture of the pine needles, enhancing the overall appearance of your festive tree sketch.
-
Are there any simple steps included in the Christmas tree drawing tutorial for beginners?
Yes, Christmas tree drawing tutorials for beginners typically include simple steps, such as drawing a basic tree outline, adding horizontal lines for branches, and a star on top.
These easy-to-follow instructions make it easy peasy for anyone to draw a cute or cartoon Christmas tree, perfect for a merry Christmas card or decoration.
Wrapping Up How to Draw a Christmas Tree
How To Draw a Christmas Tree, with its curve and curved lines, has been made easy to follow in this step by step drawing tutorial.
This guide has provided you with an easy how to draw approach, ensuring that each step is clear and manageable.
By following this step drawing tutorial, you’ve learned the techniques to create a festive and detailed Christmas tree.
I hope you gain value from How To Draw a Christmas Tree with this Step by Step Tutorial.
If you like this article about How to Draw A Christmas Tree and would like to know more, please comment below.


Thank you for this easy to understand, step by step. Just just just beginning. So slow going, but enjoyable and challenging. Thank you again.
Judy