

How to Draw a Diamond: Step by Step Diamond Drawing Tutorial
Welcome to this How to Draw a Diamond Step by Step Diamond Drawing Tutorial!
In this tutorial, we will be learning how to draw a diamond easily.
Whether you’re a beginner or an experienced artist, this tutorial will guide you through the process of creating a beautiful diamond drawing from start to finish.
You might also like:
- How to Draw for Kids
- Creative Drawing Ideas
- List of Art Supplies for Beginner’s
- Art Supplies for Toddlers List
- Art Supplies List for Preschool
- Art Supplies List for Elementary School
- Art Supplies List for Middle School
- Art Supplies List for High School
- List of Art Supplies for Artists
- List of Art Supplies for Painting
What is Diamond Drawing?
Diamond drawing is the art of creating a visual representation of a diamond on paper.
It involves using various techniques and tools to capture the sparkle and shape of a diamond.
With practice and attention to detail, you can create a realistic and impressive diamond drawing.
Materials Needed for Diamond Sketch
Embarking on a diamond sketch requires a few essential materials to bring the brilliance of this gemstone to life on paper.
ather your pencils, erasers, and sketchpad, and prepare to capture the diamond’s intricate play of light and shadow.
Drawing Paper
- The first essential material you’ll need is drawing paper.
- Choose a high-quality paper that is smooth and thick enough to handle the pressure of drawing with a pencil.
- A sturdy paper will ensure that your diamond drawing comes out clean and precise.
Pencil
- A pencil is an indispensable tool for diamond drawing.
- It allows you to create light, delicate lines that can be easily erased if needed.
- Choose a pencil with a medium hardness, such as an HB or 2B, for a good balance between precision and ease of use.
Eraser
- An eraser is a must-have for any drawing project, including diamond drawing.
- It allows you to correct mistakes and remove unwanted lines.
- Opt for a soft eraser that won’t damage your paper, and make sure to keep it handy throughout the drawing process.
Ruler
- Using a ruler is essential for creating straight lines in your diamond drawing.
- A straight line is crucial for capturing the shape and edges of a diamond accurately.
- Make sure to use a sturdy ruler that won’t slip or bend while drawing, ensuring precision in your artwork.
How to Draw a Diamond Step by Step Tutorial
Drawing a diamond can seem like a daunting task due to its complex structure and reflective surfaces.
However, with this easy-to-follow step-by-step drawing tutorial, you’ll be able to draw a great-looking diamond with ease.
Whether you’re a beginner looking to improve your drawing skills or someone who enjoys creating beautiful art, this guide is perfect for you.
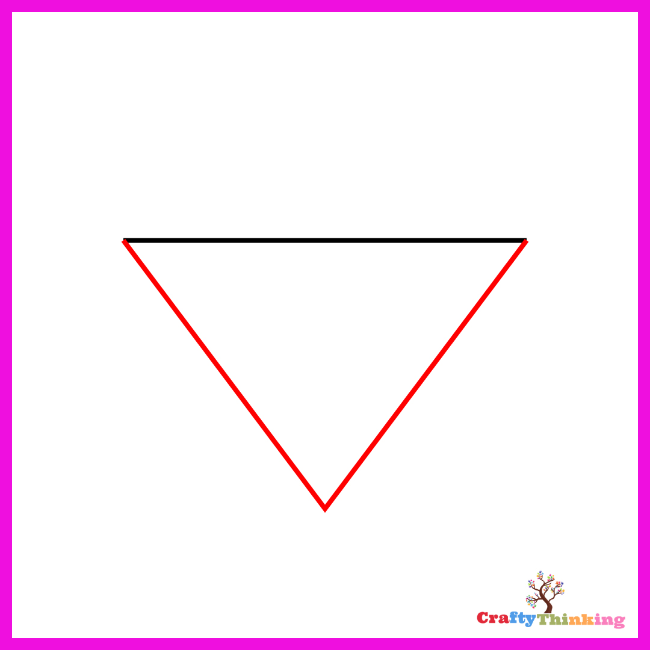
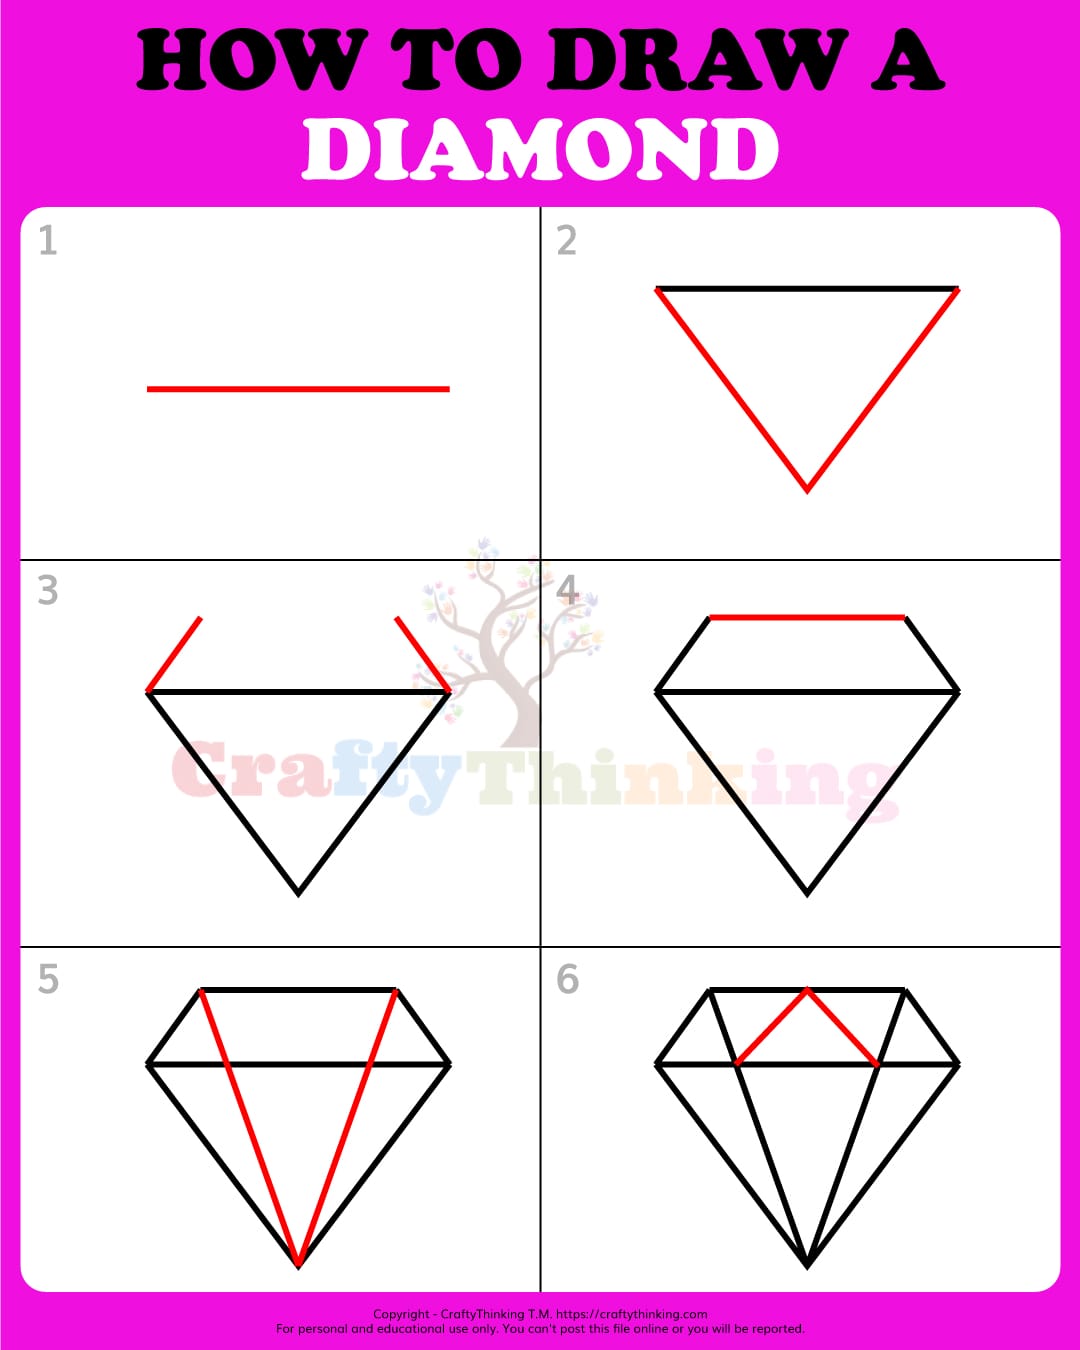
Step 1: The Foundation
- Begin your diamond drawing by sketching a horizontal line using a light pencil.
- This line represents the top of your diamond and is the foundation from which your diamond shape will emerge.
- Keep your strokes light, as some lines will be erased later.

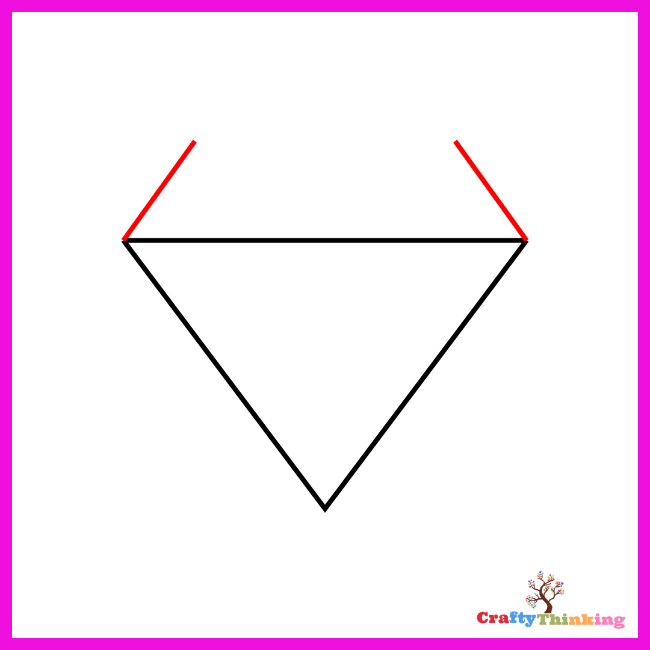
Step 2: Creating the Shape
- From the ends of your top line,
- Draw two diagonal lines converging downwards to form a V shape,
- Similar to the bottom of the diamond.
- This step is crucial as it outlines the outer edges of the diamond and sets the stage for the intricate details to come.
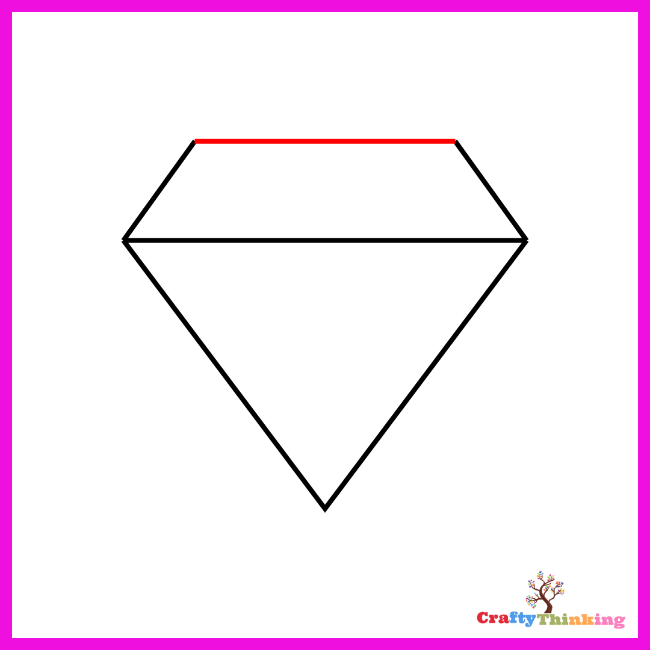
Step 3: Building the Top
- Above the initial triangle, add two more lines to create a trapezoid, mimicking the top of the diamond in the previous step.
- This step begins to give your diamond drawing depth and dimension, starting at the top and working downwards.
Step 4: Completing the Outline
- Connect the open ends of the trapezoid with a straight line, completing the top diamond shape.
- At this stage, your drawing will have the basic outline of a diamond, with the top and bottom parts clearly defined.
Step 5: Adding the Facets
- Stretch two long diagonal lines from the top corners of the trapezoid down to the bottom point of the initial triangle.
- These lines are essential for the crystalline structure, dividing your diamond into its sparkling facets.
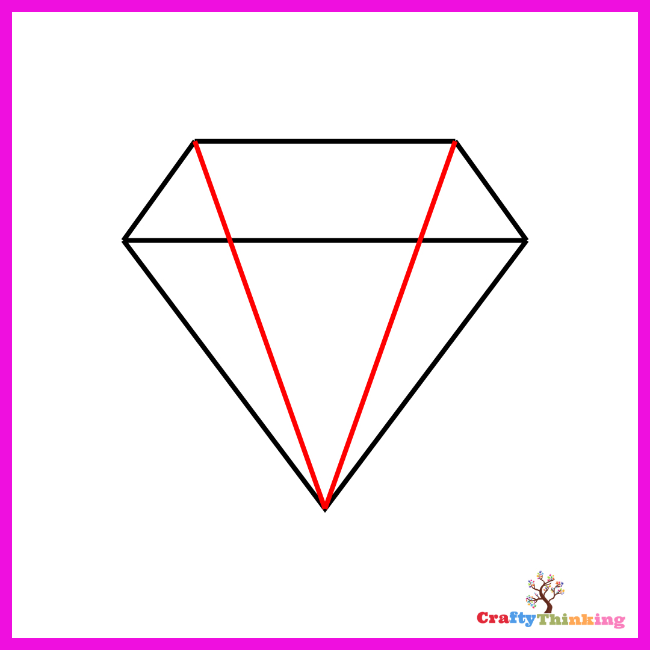
Step 6: The Inner Triangle
- Within the central space, draw a smaller triangle starting from the point where the diagonal lines intersect at the top.
- This inner triangle is a key feature in giving your diamond its three-dimensional appearance.
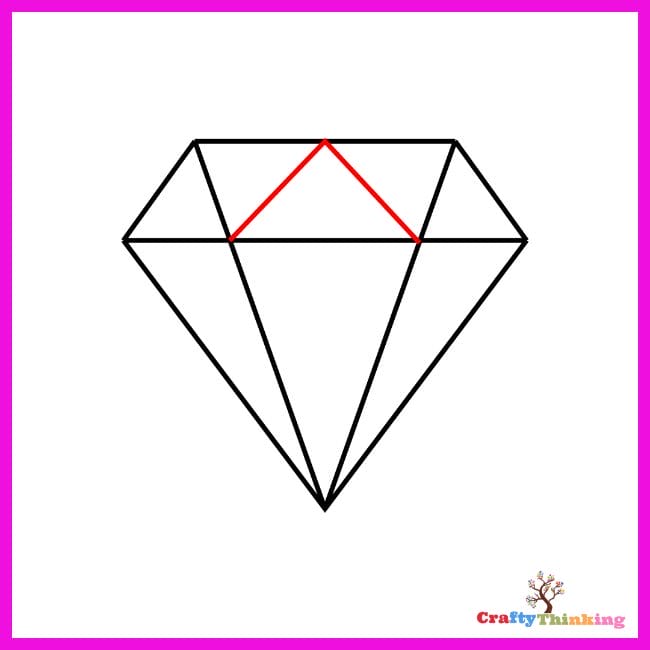
- To add the diamond’s signature sparkle, sketch a few short straight lines at the top of your diamond.
- These represent the light reflecting off the diamond’s surface, making it look shiny and realistic.
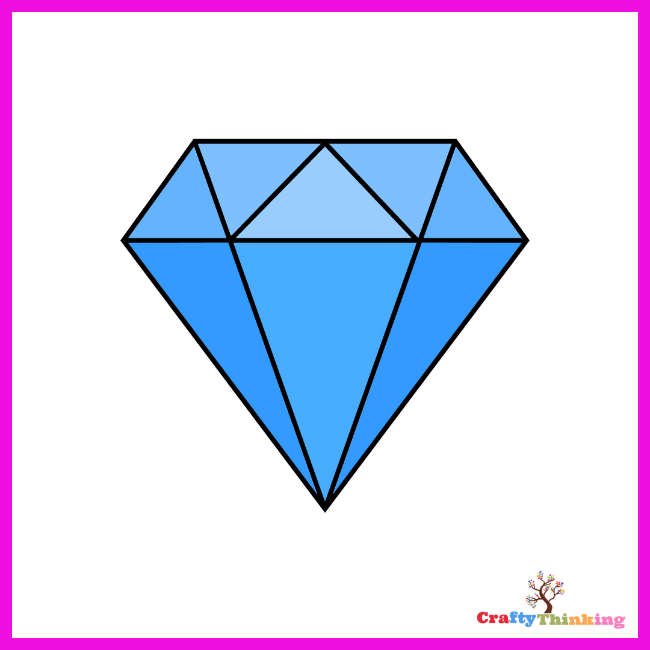
Step 7: Shading and Coloring
- Shade your diamond drawing with darker pencil strokes along the edges
- And lighter strokes near the center to simulate light reflection.
- This step is to add depth and make your diamond look three-dimensional.
- Feel free to grab your crayons or watercolors to color your diamond,
- Enhancing its beauty with colors and patterns that reflect light in a mesmerizing way.
Congratulations!
- You’ve just completed the step-by-step drawing of a diamond, transforming a few simple lines into a sparkling gem.
- This tutorial makes drawing a diamond easy and accessible,
- Proving that with the right instructions, anyone can create a realistic and beautiful piece of art.
We provide tutorials like this to help you never miss an opportunity to learn something new.
Be sure to check out similar posts for more fun drawing projects and download the free printable guides to practice your new skills.
How to Draw a Realistic Diamond
Drawing a realistic diamond involves understanding the geometry and physics of light as it interacts with the diamond's facets.
You'll start by sketching the basic shape, which is often a combination of triangles and quadrilaterals, to form the diamond's outline.
The next steps will involve refining the shape, adding the facets with precision, and then the most crucial part, shading.
Shading is what gives the diamond its three-dimensional appearance and sparkle.
You'll need to observe where the light falls and the shadows it creates, as well as the subtle gradations in tone that suggest depth and brilliance.
The final touches will include adding the reflections and refining the contrast to make your diamond truly shine.
Materials
- Graphite pencils (2H, HB, 2B, 4B, 6B)
- High-quality drawing paper (preferably smooth, Bristol paper)
- Erasers (kneaded and standard)
- Blending stumps or tortillons
- Ruler for straight lines
- Fine liners or a pen for sharp edges
Instructions
Initial Shape and Guidelines:
- Start with a light sketch using a 2H pencil to create the basic outline of the diamond.
- This includes a central vertical line and angled lines to form the top and bottom facets.
Refining the Outline:
- Switch to an HB pencil to refine the outline of the diamond, ensuring that the top and bottom facets are symmetrical.
Adding the Facets:
- With the basic shape in place, begin adding the individual facets.
- Use a ruler for precision and keep the lines light as these will be guidelines for shading.
Detailing the Crown and Pavilion:
- Define the crown (top part) and pavilion (bottom part) of the diamond, using more precise lines to separate the facets clearly.
Shading for Realism:
- Employ a range of pencils from 2B to 6B to shade the facets.
- The key is to observe where the light source is coming from and shade accordingly,
- With the lightest facets being closest to the light source and the darkest facets being furthest away.
Adding Brilliance and Fire:
- Use a blending stump to smooth out the pencil strokes within each facet, giving a more glass-like texture. 4
- For the 'fire' (the colored light that diamonds reflect), subtly add colors with a light touch using colored pencils if desired.
Final Touches:
- Go over the darkest areas again to deepen the contrast.
- Use a fine liner or a pen to outline the sharpest edges of the diamond to make them pop.
Cleaning Up:
- Use the eraser to clean up any stray marks or smudges.
- A kneaded eraser is particularly useful for lifting graphite to create highlights.
Review and Adjust:
- Step back and review your work,
- Making any necessary adjustments to the shading to ensure that the diamond looks three-dimensional and radiant.
Final Note:
- Wrap up the guide by encouraging the reader to practice and experiment with different light sources and diamond shapes.
- Remind them that the key to drawing a realistic diamond lies in the subtlety of shading and the sharpness of the edges.
Notes
Did you create this craft? If so, we would love to hear from you! Please feel free to leave a comment on the blog or share a photo of your creation on Pinterest.
Recommended Products
Thank you for supporting our family-owned business!


Different Styles of Drawing a Diamond
Discover the myriad of styles to bring the timeless sparkle of diamonds to paper, from the geometric precision of a jeweler’s sketch to the abstract flair of modern art.
Explore techniques that capture the diamond’s complex facets and radiant light play, each method offering a unique interpretation of this iconic gem.
Realistic Diamond Drawing
- For a realistic diamond drawing, pay close attention to the details and the way light reflects off the gem.
- Add shading and highlights to create a three-dimensional effect and make the drawing come to life.
Cartoon Diamond Drawing
- If you prefer a more simplified and playful style, you can draw a cartoon diamond.
- Focus on creating bold outlines and vibrant colors to give your diamond a fun and animated look.
Tips and Tricks
When drawing a diamond, there are several tips and tricks that can help you create a more realistic and visually appealing drawing.
By utilizing these techniques, you can enhance the overall look of your diamond artwork.
Use Light Pencil Strokes
- One of the key tips in diamond drawing is to use light pencil strokes.
- By applying gentle pressure with your pencil, you can create delicate and refined lines that replicate the smooth surfaces of a diamond.
- Light strokes also make it easier to make adjustments and erase any mistakes without damaging the paper.
Practice Shading to Add Depth
- Shading is an essential technique in diamond drawing that adds depth and dimension to your artwork.
- By using different shades of graphite or colored pencils, you can create highlights and shadows that mimic the way light interacts with a diamond’s facets.
- This technique helps give your drawing a realistic and three-dimensional appearance.
Experiment with Different Sizes and Shapes
- Don’t be afraid to experiment with different sizes and shapes of diamonds.
- While the classic diamond shape is most commonly depicted, you can also try drawing fancy shapes such as oval, pear, or marquise diamonds.
- Exploring different designs will not only expand your drawing skills but also allow you to create unique and captivating diamond drawings.
Review of Steps Learned
- In this step-by-step diamond drawing tutorial, we have learned the process of drawing a diamond easily.
- We started by drawing a straight line, adding the top and bottom points, and connecting them to form a triangle.
- Then, we drew the sides of the diamond and refined the shape with details and shading.
Encouragement to Keep Practicing
- Diamond drawing is a skill that improves with practice and patience.
- To become proficient in drawing diamonds, keep practicing regularly and continue experimenting with different styles and techniques.
- With dedication and perseverance, you can create stunning diamond artwork that will impress others.
Wrapping Up Learn How to Draw a Diamond Step-by-Step
How to Draw a Diamond has never been more approachable than with this step-by-step guide, designed to demystify the process and unlock your artistic potential.
From the initial line to the final shading, each step has been crafted to ensure clarity and ease, allowing you to create a sparkling gem on paper.
I hope you gain value from How to Draw a Diamond Step by Step, and that it inspires you to continue exploring the facets of drawing and creativity.
If you like this article about How to Draw a Diamond and would like to know more, please comment below.


