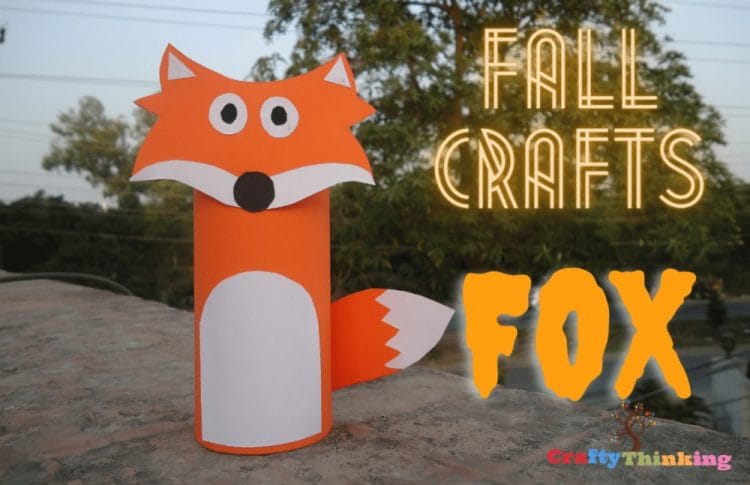
Easy Toilet Paper Roll Fox Craft
Crafts are very important for the growth of art skills in kids. In this fall crafts for kids, we will learn how to make this Toilet Paper Roll Fox Craft in easy step-by-step tutorial. This craft will help children to learn about animals that live in the jungle. Foxes are an active member of the jungle community; they are cunning and hold an important place in the jungle.
Quick Fox Facts
Foxes are a part of the canidae family. They have triangular shaped ears, large feet with five toes on each foot, and sharp teeth. Foxes live in dens or burrows that they dig up themselves. The fox is an important predator because it keeps other populations in check by hunting small animals like rats, rabbits, mice etc.
The red fox is the most common species found all over North America but there are many other subspecies which differ in size and coloration depending on their habitat or location around the world. For example, arctic foxes have thick fur to keep them warm during cold winters while desert foxes have adapted to living without any water due to dry conditions for months at a time. Some people even tame

What You Need:
- Orange colored sheet
- White colored sheet
- Black colored sheet (optional as you may want to use the black marker instead)
- Black marker
- Scissors
- Glue stick/glue tube
- Pencil (as you might need to rub out a few things)

Toilet Paper Roll Fox Craft
Firstly you will have to bring out your orange colored sheet and cut it from the side that has the shorter length and cut it according to the roll’s size.
Step 1:

Now apply glue to the inside of the orange sheet and begin slowly attaching it to the roll, neatly and in the proper way. This will give you a roll that will just look like it was orange from the start!
Step 2:

Now take two more small pieces from the leftover orange sheet and you will now have to show your drawing skills. Draw the shape of a fox face: first, leave a long curve for the forehead, then draw two ears which are stretching out to become two triangles, and then they begin to bend downwards with a sharp corner and a fluent curve shape at the end. This is it! You have made our fox’s face!
Now make the tail on the second piece of orange paper by making around at the bottom and improve its shape on top with a sharp corner. Easy, isn’t it?
Step 3:

Now cut out the shapes you made in Step 3 very carefully without messing up. You may be thinking that the face is too short in width but it will look perfect once it’s done.
Step 4:

Now it is time to make the details: at least our fox needs eyes! First, take a piece of white paper and cut out a smile that is going to curve at the ends. Next cut two eyes and make the pupil using the black marker. It would look funny if you make the eyes going in different directions!
Make two teeny- weeny triangles on a white-colored sheet and cut them out too. To these tasks, also make a small circle from black paper that could work out like a nose for the fox. You can also use a black marker instead. Also, cut out the texture for the tail of the fox which is just like the shape of the tail from the top with some zig-zags at the bottom.

Step 5:
It is now time to paste all the stuff we made in Step 4 and 5 together using a glue stick.
First, paste the tail cut-outs on the top of the tail. Next, paste the white texture of the face like done along with the eyes on the top. Glue the small triangles on the ears and the nose on top of the white fur.
Step 6:

Now paste the body features we have made on the roll. Paste the face so that it is higher than the top end of the roll. Attach the tail at the back of the roll using glue.
Step 7:

Now cut a piece of a rectangle from the white plain sheet and make it round at the top. Paste it at the bottom end of the roll, under the fox’s face.
Step 8:

We hope you enjoyed this article about how to make a toilet paper roll fox. This is such a fun project for kids (or adults) to do since it doesn’t take much time or material investment.
If you like this article and would like to know more, please comment below.


